
An easy way to change slide sizes in PowerPoint presentations to 4:3 (Standard) or 16:9 (Widescreen) formats without breaking your theme and template or stretching your logos and images.
As with most things related to technology, there is more than one way to skin the cat – or in our case to resize PowerPoint presentations. We are going to discuss both the standard way (as well as why we don’t recommend it) and the right way, using our FREE PowerPoint resizing tool.
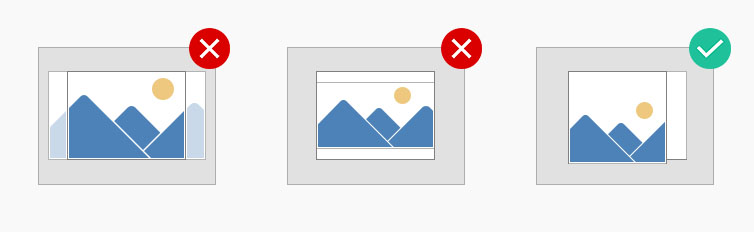
If you ever changed a presentation to Standard or Widescreen sizes in PowerPoint and thought you would likely agree that the outcome was unpredictable and undesirable.
TLDR: If you want to skip the details and go straight to the instructions on how to use our FREE PowerPoint presentation resizing tool to change slide sizes without breaking your slide content then Click Here.
Why the standard solution does not work:
In short, the standard way to resize your PowerPoint changes and breaks your fonts.
Using the PowerPoint resize tool also stretches images, graphics, and logos on your slide and Slide Master Layouts.
The best way to explain what is wrong with this method – is to show you. With your presentation open go to the Design Ribbon and click on the Slide Size drop-down menu and select either the Standard(4:3) or Widescreen(16:9) aspect ratios.
You can pick either ‘Maximize’ – which will cause your content to flow over the edges of the screen or ‘Ensure Fit’ which will create empty gaps on either side of your presentation.
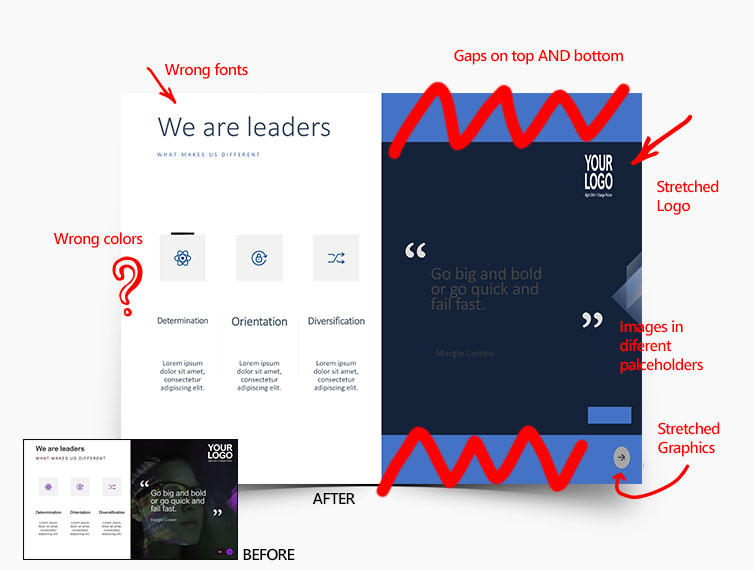
Whichever of the two options you select the result is not going to be what you want. Your slide content probably looks broken, logos might be stretched, the theme’s font has changed to Calibri, your corporate colors might have disappeared and your Master Layout’s placeholders are resized disproportionally.
METHOD 1: The standard way, how to change PowerPoint Slide Sizes in Windows 10 or Mac:
Part 1: Before you change your PowerPoint slide size
Step 1: Make sure your presentation is in its original working format.
Step 2: Save your Theme color scheme.
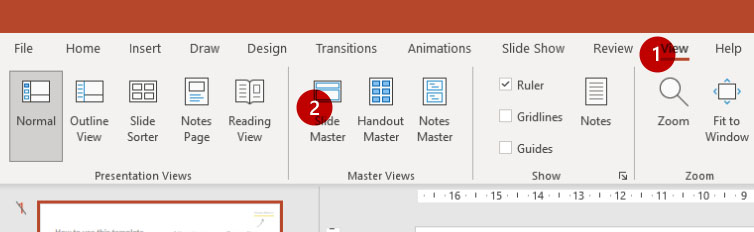
1) Click on the View Ribbon,
2) then the Slide Master button
3) Click on the Colors drop-down menu and then on the
4) Customize Colors… button at the bottom of the list.
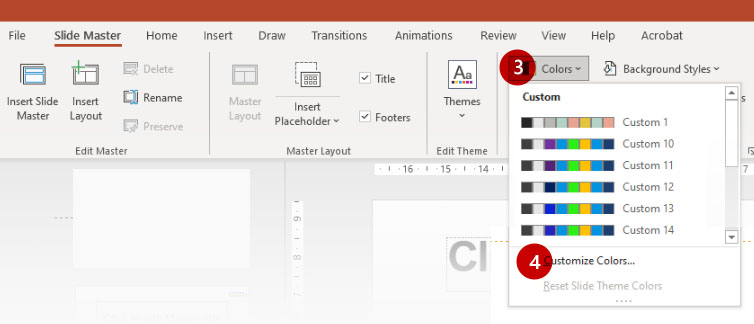
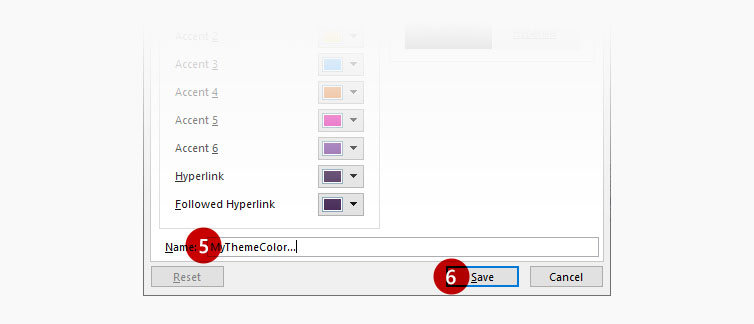
At the bottom of the Colors dialog box give your color scheme a name in the Name field – and call it whatever you want but remember the name because we are going to use that after we resize our template. Click on Save.
Step 3: Save your Theme fonts
1) While still on the Slide Master Ribbon click on the Fonts drop-down menu and then on the
Customize Fonts… button at the bottom of the list.
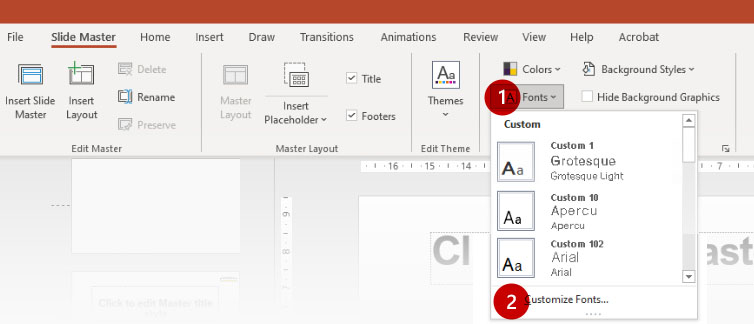
2) In the Name field give your Theme Fonts a name that you will use and click on the Save button.
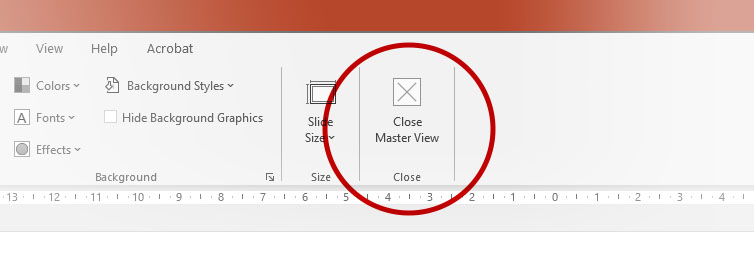
3) Close the Slide Master Ribbon by clicking on the “Close Master View” button.
Part 2: After you change your slide size
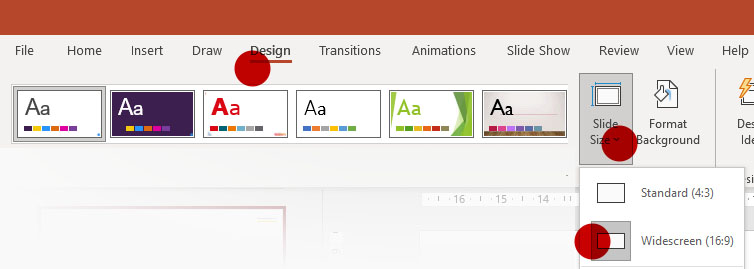
Step 4: Resize your PowerPoint presentation
After you close the Slide Master Ribbon the Design Ribbon should be visible again. Click on the Slide Size drop-down menu and select either the Standard(4:3) or Widescreen(16:9) aspect ratios and select the ‘Ensure Fit’ option (it is easier to move items around than to also have to resize them especially when converting to a larger slide size).
Step 5: Reselect your Theme color and Theme font
With the Design Ribbon still active click the Variants drop-down menu, then color and select the Color Theme you saved earlier, and then do the same for your fonts.


Step 6a: Fix stretched images – Method 1
Here is a quick hack to fix stretched graphics and images.
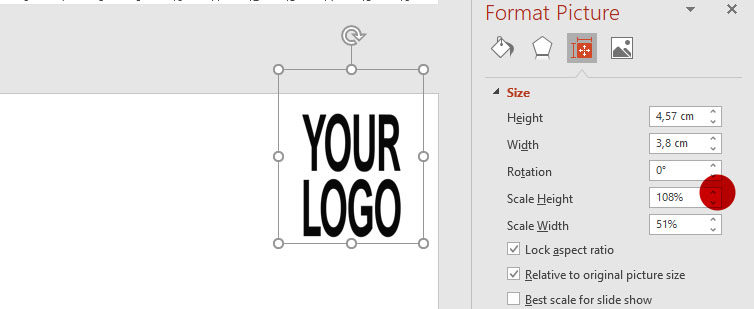
1) Right-Click on the stretched image and select “Size and Position” to open the Size and Position Task Pane. You will notice the Scale Height and the Scale Width are different, for example; Scale Height might be 99% and Scale Width might be 74%.
2) All you need to do to fix your image is press the up or down arrow on either the Width or Height and voila, your image is no longer stretched. If that doesn’t work then make sure Lock Aspect Ratio is checked.
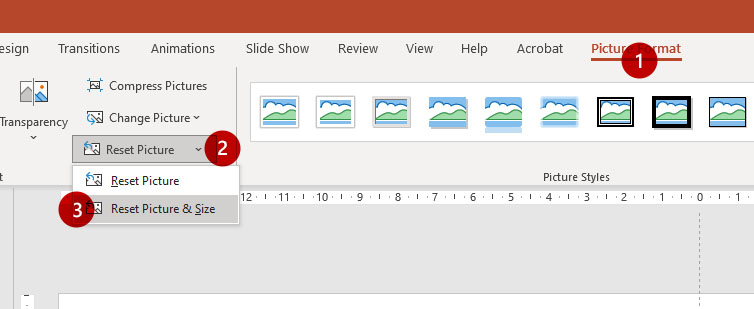
Step 6b: Fix stretched images – Method 2
Another way to resize your images is to reset your images. To do this you simply select your image and then from the Picture Format Ribbon select the Reset Picture drop-down menu and select Reset Picture & Size button.
Step 7: Move placeholders, content, and images into their new position.
The last thing to do is move items such as placeholders and images around on your presentation to make them fit better.
METHOD 2: The better way, to change your slide dimensions:
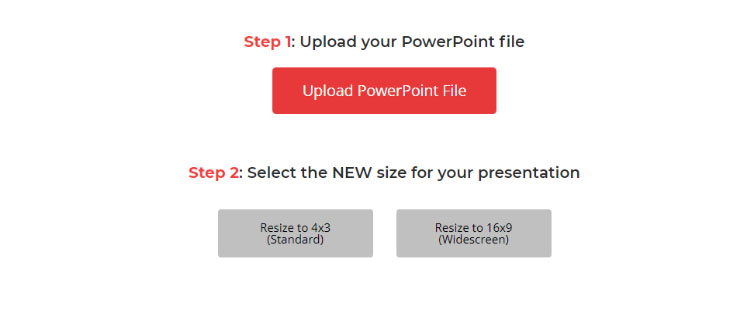
Step 1: Go to our FREE resize tool
Go to our FREE PowerPoint resize tool and Upload your PowerPoint file:
www.knockoutprezo.com/resize-powerpoint
Step 2: Select a file location and select your PowerPoint document
Step3: Select whether you want to resize to Standard or Widescreen sizes. Once you make your selection the file will upload, convert the PPTX and then then the download will start automatically.
- PowerPoint won’t stretch your images and graphics
- No more missing colors
- Your theme fonts stay as it was (Header and Body fonts)
- Your layouts stay in their original location which is a lot more predictable and easier to work with.
Step 3: Move placeholders, content, and images into their new position.
The last thing to do is move items such as placeholders and images around on your presentation to make them fit better.
More PowerPoint Fixes
If you are interested, we also have two other PowerPoint Fixing tools, they are:
- Replace and fix my PowerPoint fonts – (Find Out More)
- Change and fix my PowerPoint authoring language across all slides and Master Layouts – (Find out more)


2 Responses
Unfortunately, the resizing tool did not work for my use case. It simply overlayed a different slide deck formatting, but didn’t change any configurations, which made the deck useless. I like the thought for this tool though, as reformatting slides is a huge pain and time drain.
Do you mind me asking about your feedback about our resize tool.
I didn’t quite understand your feedback.
Essentially what the tool does is that it resizes the deck without breaking, stretching etc the presentation assets, HOWEVER the user still needs to adjust the elements of the presentation. Did you go from 16×9 to standard or the other way around? There isn’t a way for the software to tell if you want an element aligning to the left, middle or right of the slide for example.